Delicious Recipe of Bengali Kheer Pitha

Introduction of Bengali Kheer Pitha
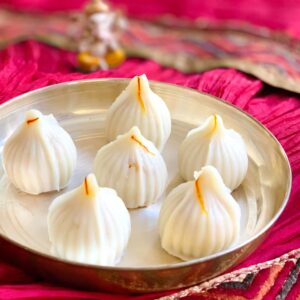
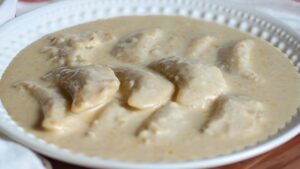
Bengali cuisine is renowned for its sweets, and pithas hold a special place in Bengali hearts. These delicacies are especially popular during festivals like Poush Parbon (the harvest festival), winter seasons, and celebratory occasions. One of the most cherished among them is the Kheer Pitha. In this recipe, “kheer” refers to a sweetened milk or condensed milk filling, which is encased in a dough made of rice flour. This article will take you on a deep dive into making Kheer Pitha, sharing traditional techniques, ingredients, and tips to perfect this mouth-watering Bengali delicacy.
Origins and Significance of Kheer Pitha
Pithas have been a part of Bengali traditions for centuries. Their preparation, especially during the winter harvest season, is symbolic of abundance and celebration. Kheer Pitha, in particular, is a delightful treat made with locally available ingredients—rice, jaggery (or sugar), coconut, and milk. These are primarily steamed or fried, giving them a soft, melt-in-the-mouth texture. The Kheer Pitha represents love, care, and the art of slow cooking. In a way, it’s a reflection of the laid-back, affectionate culture of rural Bengal.
Key Ingredients
Before we dive into the step-by-step process, let’s explore the key ingredients and their role in the recipe:
Rice Flour: The base of the dough for the pitha. Traditionally, freshly ground rice flour is used for its finer texture and unique flavor. It gives the pitha a soft, slightly chewy exterior.
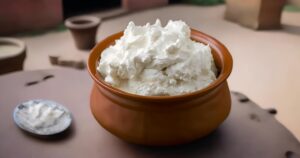
Kheer (Sweetened Milk Filling): Made with thickened milk (reduced to a semi-solid state), this creamy filling gives the pitha its rich, decadent flavor. Sugar or jaggery can be used as sweeteners.
Jaggery (Nolen Gur): In Bengal, jaggery made from date palm sap, known as nolen gur, is widely used. This variety of jaggery imparts a distinct, earthy sweetness to the kheer.
Coconut: Freshly grated coconut is often added to the kheer mixture or the dough to enhance flavor and texture.
Milk: Full-fat milk is essential for making the kheer. The slow cooking process helps concentrate the milk’s natural sweetness and flavor.
Ghee: Clarified butter is used for greasing, frying, or flavoring. It adds richness and depth to the final dish.
Spices (Optional): Cardamom, nutmeg, or bay leaves may be used to flavor the kheer.
Step-by-Step Process to Make Kheer Pitha
- Preparing the Dough
Ingredients:
- 2 cups of rice flour (preferably freshly ground)
- 1 ½ cups of water
- A pinch of salt
Process:
- Boil the Water: In a heavy-bottomed pan, bring the water to a boil. Add a pinch of salt to enhance the flavor of the dough.
- Add the Rice Flour: Gradually add the rice flour to the boiling water while stirring continuously to avoid lumps. Continue stirring until the mixture comes together as a soft, smooth dough. It should pull away from the sides of the pan.
- Cool and Knead: Transfer the dough to a flat surface or a large bowl and let it cool slightly. Once it’s cool enough to handle, knead it gently with your hands to ensure a smooth, pliable consistency. If the dough feels too dry, sprinkle some warm water and knead again.
- Rest the Dough: Cover the dough with a damp cloth and let it rest for 10-15 minutes while you prepare the filling.
- Making the Kheer Filling
Ingredients:
- 1 liter of full-fat milk
- 1 cup of sugar or jaggery (Nolen gur preferred)
- ½ cup of grated coconut (optional)
- 2-3 cardamom pods (optional)
- 2 tbsp of ghee
Process:
- Boil the Milk: In a heavy-bottomed pan, bring the milk to a boil. Once it starts boiling, reduce the heat to low and simmer the milk, stirring occasionally to prevent it from sticking to the bottom.
- Reduce the Milk: As the milk reduces, you’ll notice it thickening. Scrape the sides of the pan to incorporate the cream back into the mixture. This process of reducing milk may take around 30-40 minutes, depending on the heat level.
- Add Sweetener: Once the milk has thickened to about half its original volume, add the sugar or jaggery. If using jaggery, ensure the milk has cooled slightly before adding it, as high heat can cause the milk to curdle.
- Coconut and Cardamom: Stir in the grated coconut and crushed cardamom pods for added flavor. Simmer the mixture for another 10 minutes until it reaches a thick, creamy consistency.
- Add Ghee: Finally, add the ghee to enhance the richness of the filling. Once the kheer has reached a thick, almost solid consistency, remove it from the heat and let it cool.
- Shaping the Pithas
- Divide the Dough: Take small portions of the rested dough and roll them into smooth balls, roughly the size of a small lemon.
- Flatten the Dough: Using your palms, flatten each ball into a disc shape, about 2-3 inches in diameter. You can use a rolling pin for even thickness if needed.
- Stuff the Pithas: Place a spoonful of the prepared kheer filling in the center of the flattened dough disc. Carefully fold the dough over the filling, forming a semi-circle. Pinch the edges together to seal the pitha. You can crimp the edges for a decorative finish.
- Cooking the Pithas
There are two traditional methods for cooking Kheer Pitha: steaming and frying.
Option 1: Steaming
Prepare the Steamer: Fill a large pot with water and bring it to a simmer. Grease the steaming basket or cloth with ghee to prevent the pithas from sticking.
Steam the Pithas: Place the shaped pithas in the steamer and cover with a lid. Steam for 15-20 minutes, or until the pithas turn translucent and the dough feels firm to the touch.
Cool and Serve: Once cooked, remove the pithas from the steamer and let them cool slightly. They can be served warm or at room temperature.
Option 2: Frying
Heat the Oil: In a deep frying pan, heat enough oil or ghee for deep-frying.
Fry the Pithas: Gently lower the stuffed pithas into the hot oil. Fry them on medium heat until they turn golden brown on all sides. Be careful not to overcrowd the pan.
Drain the Excess Oil: Once fried, remove the pithas from the oil and place them on paper towels to drain the excess oil.
Serving Suggestions
Kheer Pitha can be enjoyed warm or cold, depending on your preference. They are often served with a drizzle of additional nolen gur or sugar syrup, which enhances the sweetness and gives them a glossy finish. Traditionally, pithas are enjoyed with a cup of hot tea or as part of a festive meal. Their soft, chewy texture, combined with the creamy richness of the kheer, makes them a perfect dessert or snack.
Conclusion
Kheer Pitha is more than just a sweet dish; it’s a labor of love, a symbol of togetherness, and a testament to the rich culinary traditions of Bengal. The process of making pithas is slow, but the result is a delicate, flavorful treat that’s worth every bit of effort. Whether you’re making them for a special occasion or just to indulge in something sweet, this recipe will guide you through each step, ensuring that your Kheer Pithas are perfect every time.
FAQs for Bengali Kheer Pitha Recipe
What is the best type of rice flour to use for Kheer Pitha?
Traditionally, freshly ground rice flour is preferred for making Kheer Pitha as it has a finer texture and adds better flavor. However, store-bought rice flour can also be used if freshly ground flour is not available.
Can I use sugar instead of jaggery in the filling?
Yes, you can substitute jaggery with sugar, but using jaggery (especially Nolen Gur) imparts a distinct earthy sweetness and a rich flavor to the kheer filling.
Why does my dough crack while shaping the pitha?
If the dough is cracking, it may be too dry. To fix this, add a little warm water and knead the dough again until it becomes soft and pliable.
How do I know when the kheer filling is ready?
The kheer should be thick enough to hold its shape and not runny. It is ready when the milk has reduced significantly and reaches a semi-solid consistency.
What are the common mistakes to avoid while making Kheer Pitha?
Avoid adding jaggery to very hot milk as it can cause curdling. Also, ensure the dough is neither too dry nor too wet to prevent cracking or difficulty in shaping the pithas.
Can I steam and fry the pithas together?
It’s best to choose one method—steaming results in a soft and chewy texture, while frying gives a crispy exterior. Combining both methods might affect the overall texture and taste.
How should I store leftover Kheer Pithas?
Store leftover Kheer Pithas in an airtight container in the refrigerator for up to 2 days. Reheat them gently in a steamer or microwave before serving.
Can I make the dough or filling in advance?
Yes, you can prepare the kheer filling in advance and store it in the refrigerator for up to 2 days. However, it’s best to make the rice dough fresh as it tends to dry out if stored for long.
What can I use as a vegan substitute for milk in the filling?
For a vegan version, substitute dairy milk with coconut milk or almond milk. Adjust the consistency by simmering until it thickens to the desired texture.
Why did my pithas fall apart during steaming?
If the pithas are falling apart, it might be due to improper sealing or overfilling. Ensure that the edges are sealed tightly, and avoid overstuffing the pitha with kheer filling.